
| 일 | 월 | 화 | 수 | 목 | 금 | 토 |
|---|---|---|---|---|---|---|
| 1 | 2 | 3 | ||||
| 4 | 5 | 6 | 7 | 8 | 9 | 10 |
| 11 | 12 | 13 | 14 | 15 | 16 | 17 |
| 18 | 19 | 20 | 21 | 22 | 23 | 24 |
| 25 | 26 | 27 | 28 | 29 | 30 | 31 |
- Interceptor
- 객체지향프로그래밍
- aop
- mybatis
- Filter
- 인터셉터
- spring boot
- 스프링 시큐리티
- MYSQL
- Spring Security
- 자바
- Spring
- RestControllerAdvice
- OOP
- response
- exception
- 디자인패턴
- request
- network
- java
- 트랜잭션
- aspect
- git
- SQL
- 스프링부트
- 관점지향프로그래밍
- 스프링
- Redis
- http
- proxy pattern
- Today
- Total
장쫄깃 기술블로그
[Spring Boot] @Scheduled 사용 및 동작원리 본문

Scheduling (스케줄링)
스케줄링은 어떤 작업 (job)에 대해서 지정된 기간 혹은 시간에 동작하도록 하는 것이다. Spring에서 스케줄 작업을 처리하기 위해서는 Quartz Scheduler와 같은 외부 라이브러리를 이용하거나 Spring Boot에서 제공하는 @Scheduled 어노테이션을 이용하여 간단하게 동작시킬 수 있다.
Quartz Scheduler 라이브러리는 보다 정교하게 job 스케줄링을 다룰 수 있다. 하지만 설정과 사용에 번거로운 단점이 있다. 반대로 @Scheduled는 사용하기 매우 쉽다. 때문에, 만약 단순히 특정 시간 혹은 특정 간격으로 job을 수행해야 하는 정도이면 @Scheduled를 사용해도 좋을 것 같다.
@Scheduled 사용법
1. @EnableScheduling 어노테이션을 사용하여 스케줄링 사용
@EnableScheduling
@SpringBootApplication
public class SchedulerApplication {
    public static void main(String[] args) {
        SpringApplication.run(SchedulerApplication.class, args);
    }
}
2. @Scheduled 어노테이션을 사용하여 스케줄러 수행
@Component
public class TestScheduler {

    @Scheduled(fixedDelay = 1000)  // 1초마다 수행
    public void test1() {
        // ...
    }

    @Scheduled(cron = 0 * * * * *)  // 초 분 시 일 월 주 (년)
    public void test2() {
        // ...
    }
}
@Scheduled 속성
- cron
- cron 표현식 지원
- 초 분 시 일 월 주 (년)으로 표현
- fixedDelay
- ms 단위
- 이전 작업이 끝난 시점으로부터 고정된 시간을 설정
- fixedDelayString
- fixedDelay와 동일하지만, property의 값을 String으로 입력
- fixedRate
- ms 단위
- 이전 작업이 수행되기 시작한 시점으로부터 고정된 시간을 설정
- fixedRateString
- fixedRate와 동일하지만, property의 값을 String으로 입력
- initialDelay
- 스케줄러에서 메소드가 등록되자마자 수행하는 것이 아니라, 초기 지연시간을 설정
- initialDelayString
- initialDelay와 동일하지만, property의 값을 String으로 입력
- zone
- time zone 설정
- default는 서버의 time zone
@Scheduled 동작원리
Thread Pool 설정
아래 코드는 1초에 한 번씩 문자열을 출력하는 두 작업을 실행하는 코드이다. 의도는 5초간 대기 시간이 있는 test1 메소드와 별개로 test2는 1초마다 수행되길 바랐다. 그러나 실제 동작을 보면 그렇지 않았다. test1이 종료되어야 test2가 실행된다.
문자열 출력 코드
@Component
public class TestScheduler {

    @Scheduled(fixedDelay = 1000)
    public void test1() throws InterruptedException {
        Thread.sleep(5000); // 5초 대기 시간
        System.out.println("Scheduled 1 : " + Thread.currentThread().getName());
    }

    @Scheduled(fixedDelay = 1000)
    public void test2() {
        System.out.println("Scheduled 2 : " + Thread.currentThread().getName());
    }
}
결과
Scheduled 1 : scheduling-1
Scheduled 2 : scheduling-1
Scheduled 1 : scheduling-1
Scheduled 2 : scheduling-1
Scheduled 1 : scheduling-1
Scheduled 2 : scheduling-1
Scheduled 1 : scheduling-1
결과에서 볼 수 있듯이 두 task가 같은 스레드(scheduling-1)에서 처리된 것을 볼 수 있다. 한 스레드에서 두 task가 실행되고 있으므로 결국 test1이 종료되어야지만 test2가 실행되는 구조인 것이다.
해결 방법은 간단하다. Thread Pool의 개수를 늘리면 test1과 test2가 서로 다른 스레드에서 동작하게 된다.
Thread Pool을 설정하는 방법은 다음과 같다.
yml 설정
spring:
  task:
    scheduling:
      pool:
        size: 5
      thread-name-prefix: jangjjolkit-scheduler-
Configuration 설정
@Configuration
class SchedulerConfiguration implements SchedulingConfigurer {
@Override
public void configureTasks(ScheduledTaskRegistrar taskRegistrar) {
ThreadPoolTaskScheduler threadPoolTaskScheduler = new ThreadPoolTaskScheduler();
threadPoolTaskScheduler.setPoolSize(5);
threadPoolTaskScheduler.setThreadGroupName("jangjjolkit scheduler thread pool");
threadPoolTaskScheduler.setThreadNamePrefix("jangjjolkit-scheduler-");
threadPoolTaskScheduler.initialize();
taskRegistrar.setTaskScheduler(threadPoolTaskScheduler);
}
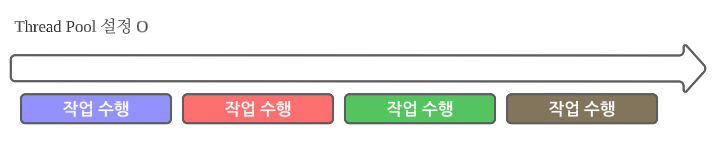
}결과
Scheduled 1 : jangjjolkit-scheduler-1
Scheduled 2 : jangjjolkit-scheduler-2
Scheduled 2 : jangjjolkit-scheduler-4
Scheduled 2 : jangjjolkit-scheduler-3
Scheduled 2 : jangjjolkit-scheduler-3
Scheduled 1 : jangjjolkit-scheduler-5
그림으로 보면 다음과 같다.

비동기 설정
Thread Pool 설정을 마쳤어도 스케줄러가 의도한 대로 동작하지 않을 수 있다. 아래 코드에서 test1이 1초마다 수행되는지 확인해 보자.
문자열 출력 코드
@Component
public class TestScheduler {

    @Scheduled(fixedDelay = 1000)
    public void test1() throws InterruptedException {
        System.out.println("start with : " + Thread.currentThread().getName());
        Thread.sleep(5000);
        System.out.println("end with : " + Thread.currentThread().getName());
    }
}
결과
start with : jangjjolkit-scheduler-1
end with : jangjjolkit-scheduler-1
start with : jangjjolkit-scheduler-2
end with : jangjjolkit-scheduler-2
start with : jangjjolkit-scheduler-1
end with : jangjjolkit-scheduler-1
start with : jangjjolkit-scheduler-3
end with : jangjjolkit-scheduler-3
결과에서 볼 수 있듯이 그저 다른 스레드에서 처리할 뿐, 각 작업은 동기적으로 처리하고 있다.
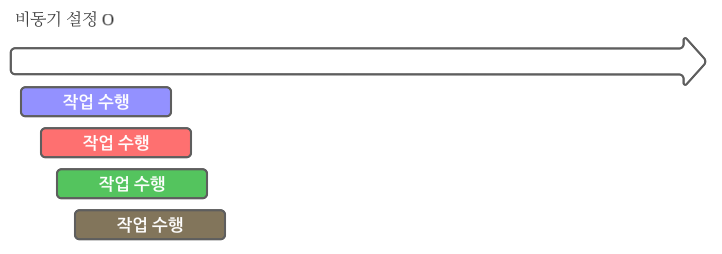
의도한 대로 task를 대기 시간과 관계없이 1초마다 수행하고 싶다면, test1을 비동기로 처리해야 한다. 비동기 처리는 Spring의 @Async 어노테이션을 사용하면 된다.
1. Async 사용 설정
@EnableAsync
@EnableScheduling
@SpringBootApplication
public class SchedulerApplication {
    public static void main(String[] args) {
        SpringApplication.run(SchedulerApplication.class, args);
    }
}
2. @Async 어노테이션 적용
@Component
public class TestScheduler {

    @Async
    @Scheduled(fixedDelay = 1000)
    public void test1() throws InterruptedException {
        System.out.println("start with : " + Thread.currentThread().getName());
        Thread.sleep(5000);
        System.out.println("end with : " + Thread.currentThread().getName());
    }
}
3. 결과 확인
start with : jangjjolkit-scheduler-1
start with : jangjjolkit-scheduler-2
start with : jangjjolkit-scheduler-3
start with : jangjjolkit-scheduler-4
start with : jangjjolkit-scheduler-5
start with : jangjjolkit-scheduler-6
end with : jangjjolkit-scheduler-1
end with : jangjjolkit-scheduler-2
start with : jangjjolkit-scheduler-7
end with : jangjjolkit-scheduler-3
start with : jangjjolkit-scheduler-8
end with : jangjjolkit-scheduler-4
그림으로 보면 다음과 같다.

'Spring Framework > Spring Boot' 카테고리의 다른 글
| [Spring Boot] log4j2 로그 레벨별 색 지정 (0) | 2024.07.16 |
|---|---|
| [Spring Boot] logback 로그 레벨별 색 지정 (4) | 2024.07.16 |
| [Spring Boot] Spring에서 프록시 패턴을 이용해 복잡한 기능 구현해보기 (0) | 2023.05.30 |
| [Spring Boot] Service에서 다른 Service 의존에 대하여 (3) | 2023.04.26 |
| [Spring Boot] 다중 데이터베이스 사용하기 (8) | 2023.01.16 |


